
BookR: School of Health Core Facilities Booking
Help: Working RemotelySchool of Health: Working Remotely
Contents
Resources & Links
- IITS "Learn, teach and work from homee" page:
https://www.concordia.ca/it/support/learn-teach-work-from-home.html - IITS Concordia VPN page:
https://www.concordia.ca/vpn
Concordia VPN
- The VPN Client can be downloaded from IITS website.
- For more details see the Concordia IITS VPN page
- VPN access requires having your Concordia MFA set up. For more details see the Concordia IITS MFA pages: MFA for staff and MFA for students
- If the FortiClient VPN app on your computer does not have a "Concordia VPN" profile already set up, and clicking the selector
for VPN name doesn't show one in the list, create one using the following settings (detailed instructions here):
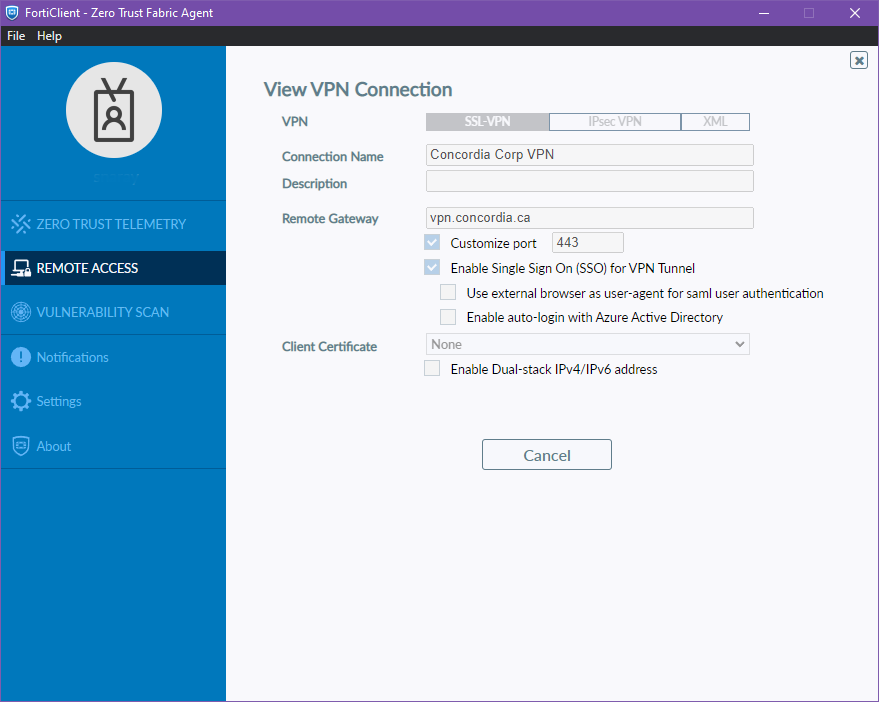
- Depending on version of FortiClient, either click the gear icon in the top-right corner or the "hamburger menu" icon (three horizontal lines) next to the VPN Name selector, and pick "Add a new connection". Use these settings:
- VPN Type: SSL-VPN
- VPN Name: Concordia VPN
- Remote Gateway: vpn.concordia.ca
- Customize port: Checked / Port number: 443
- Enable Single Sign On (SSO) for VPN Tunnel: Checked
- Click "Save"
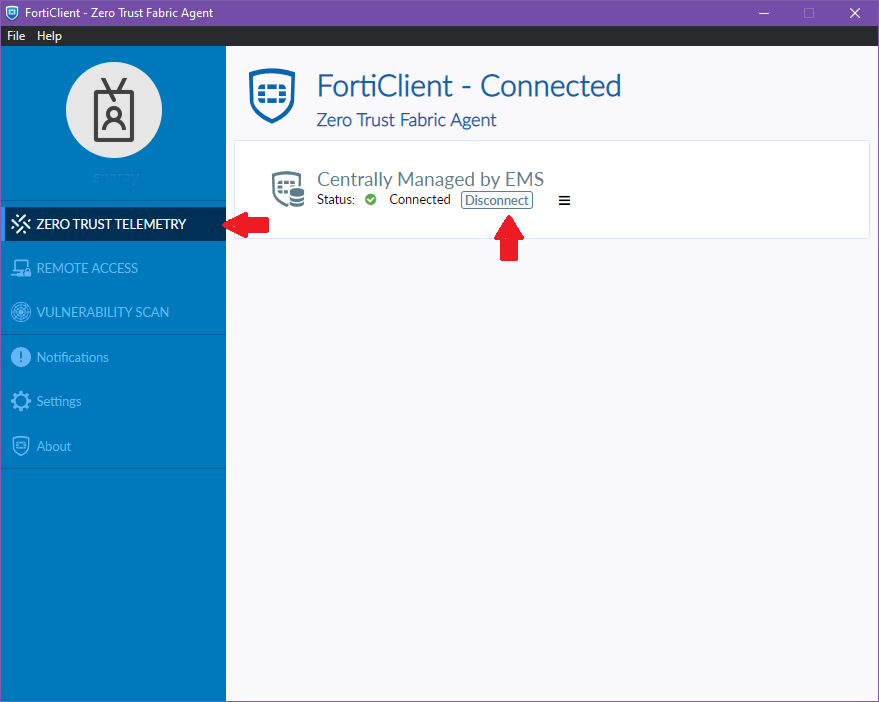
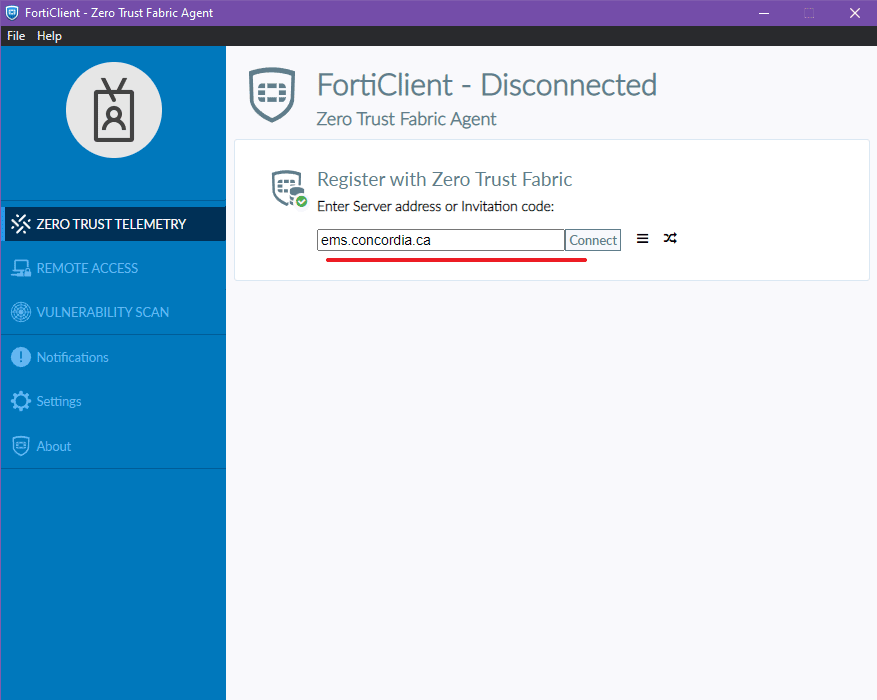
- Once successfully connected, click on the "Zero Trust Telemetry" tab and type in the EMS server address, then click Connect.
Zero Trust Fabric Server Address or Invitation Code, use the invitation code provided by IITS on their VPN information page. - Note: sometimes the VPN will appear to be connected, but you won't have access to anything. That is a bug that can occur with FortiClient for some people. *
 * One way to test this is to open the page https://myip.concordia.ca/.
If you get a very minimal page titled "Your Computer's Network and General Information" showing nothing but your IP Address, Hostname, and Browser User Agent, like in this screenshot...
Then you VPN connection is fully enabled! (or you were already at Concordia) 👍
* One way to test this is to open the page https://myip.concordia.ca/.
If you get a very minimal page titled "Your Computer's Network and General Information" showing nothing but your IP Address, Hostname, and Browser User Agent, like in this screenshot...
Then you VPN connection is fully enabled! (or you were already at Concordia) 👍
If you see some sort of error or "unreachable" message, then you are not connected.
When that happens - while still connected to the VPN - click on the "Zero Trust Telemetry" tab, and then for the EMS server click the "disconnect" button.
Wait a few seconds then click the "connect" button. If the EMS Server address is blank when disconnected, first re-enter the invitation code as mentioned above, then re-connect.
When a VPN connection is successful, within about 15 seconds you will typically get a message from FortiClient that "A configuration update was received from the Endpoint Management Server (EMS)". It is usually only at that point that you have a working VPN connection and have been permitted further access to the Concordia network.
Note: It is only possible to conenct to the VPN from Off-Campus. If you're at Concordia & on the Concordia network, you won't be able to connect to it.
Accessing Concordia Office/Lab Phones
- Access your voicemail from off-campus:
- Dial 514-848-4220
- Press *
- Enter your ID (extension) followed by #
- Enter your PIN (voice-mail password) followed by #
- Set up call forwarding from your office phone to a personal phone:
- Log into Student Hub / Carrefour and select Accounts & Settings, then Phone Configuration. Follow the prompts until you reach the Cisco Unified Communications Self Care page. Then:
- Log in using your netname and password.
- Select "Call Forwarding"
- To enable, check the box "Forward all calls to:"
- Enter your forwarding phone number, adding 9 at the beginning (e.g. 95141234567).
- To undo the forwarding, uncheck the box "Forward all calls to:".
- Log into Student Hub / Carrefour and select Accounts & Settings, then Phone Configuration. Follow the prompts until you reach the Cisco Unified Communications Self Care page. Then:
- Software Phone (Cisco Jabber): Jabber a software phone option which lets you use an application on your PC (when connected to the VPN) as your work phone. This requires IITS to set it up for you first, which will require contacting the IITS Service Desk. More instructions are on the IITS website.
Accessing SOH Shared Folders (ie. Project Folders)
The School of Health's file server hosts folders for individual research projects and individual users who are conducting research at here. These shares are accessible over the SMB protocol (also commonly referred to as CIFS or Samba).
- If off-campus, connect to the Concordia VPN - [click here for more details]
- The VPN Client can be downloaded from IITS website.
- For more details see the Concordia IITS VPN page
- VPN access requires having your Concordia MFA set up. For more details see the Concordia IITS MFA pages: MFA for staff and MFA for students
- If the FortiClient VPN app on your computer does not have a "Concordia VPN" profile already set up, and clicking the selector
for VPN name doesn't show one in the list, create one using the following settings (detailed instructions here):
- Depending on version of FortiClient, either click the gear icon in the top-right corner or the "hamburger menu" icon (three horizontal lines) next to the VPN Name selector, and pick "Add a new connection". Use these settings:
- VPN Type: SSL-VPN
- VPN Name: Concordia VPN
- Remote Gateway: vpn.concordia.ca
- Customize port: Checked / Port number: 443
- Enable Single Sign On (SSO) for VPN Tunnel: Checked
- Click "Save"
- Once successfully connected, click on the "Zero Trust Telemetry" tab and type in the EMS server address, then click Connect.
Zero Trust Fabric Server Address or Invitation Code, use the invitation code provided by IITS on their VPN information page. - Note: sometimes the VPN will appear to be connected, but you won't have access to anything. That is a bug that can occur with FortiClient for some people. *
* One way to test this is to open the page https://myip.concordia.ca/.
If you get a very minimal page titled "Your Computer's Network and General Information" showing nothing but your IP Address, Hostname, and Browser User Agent, like in this screenshot...
Then you VPN connection is fully enabled! (or you were already at Concordia) 👍
If you see some sort of error or "unreachable" message, then you are not connected.
When that happens - while still connected to the VPN - click on the "Zero Trust Telemetry" tab, and then for the EMS server click the "disconnect" button.
Wait a few seconds then click the "connect" button. If the EMS Server address is blank when disconnected, first re-enter the invitation code as mentioned above, then re-connect.
When a VPN connection is successful, within about 15 seconds you will typically get a message from FortiClient that "A configuration update was received from the Endpoint Management Server (EMS)". It is usually only at that point that you have a working VPN connection and have been permitted further access to the Concordia network.
Note: It is only possible to conenct to the VPN from Off-Campus. If you're at Concordia & on the Concordia network, you won't be able to connect to it.
- Work PC prepared by the School of Health: If you have a Windows PC that was set up by the School of Health, the shortcuts and mapped drives that are already set up on it will continue to work when remote and connected to the VPN
- If you're on a Personal Computer:
- You can reach the file server using the following URL in the Windows File Explorer address bar, or the MacOS Finder using the "Connect to Server" dialog:
Server URL:- Windows notation: \\perf-loy-nas.concordia.ca\
- Mac or Linux: smb://perf-loy-nas.concordia.ca/
- For both Windows and Mac: If you're not on a Concordia computer (ie not logging in with your Netname), you will be prompted for a login when connecting to
the file server. Enter it using your Netname in the following format: "CONCORDIA\yournetname", and provide your password.
Engineering/Computer Science users: DO NOT use your ENCS accounts. Use your Concordia Netnames to log in. All permissions are set using the Netname (ie. Student Hub / Carrefour account).
Click the checkbox for your computer to remember the login so you don't get prompted all the time.
You can also manually add credentials to the local Mac Keychain or Windows Credential Manager. - On a Windows PC, in the left navigation panel in File Explorer right-click on "Quick Access" => "Pin current folder to Quick Access" to remember the location (or any specific shared folder you will use often).
- On a Mac, use the "Connect to server" option in Finder to connect to it, and to save it in Finder.
- You can reach the file server using the following URL in the Windows File Explorer address bar, or the MacOS Finder using the "Connect to Server" dialog:
- Folders of Note: (on a Mac switch the URLs to the "smb://" format with forward slashes)
- Project folders: \\perf-loy-nas.concordia.ca\Research\Projects\ {followed by projectnumber}
- Personal research folder (R-Drive): \\perf-loy-nas.concordia.ca\Users\ {followed by yournetname}
- P.I. Group folders: \\perf-loy-nas.concordia.ca\Research\PI\ {followed by P.I. Name}
these were deprecated a long time ago, most PIs do not have these, Project Folders take that role now - You can then create shortcuts to whichever folders you use a lot on your desktop or elsewhere so you don't have to browse to it all the time or type in the path – just connect to the VPN & double-click the shortcut.
Concordia VPN
Connect to your Windows computer at Concordia
- Remote Desktop Connection (RDP)
If you want to use an on-campus machine as if you were sitting in front of it and have it work seamlessly, this is the right choice.
Do not use this is if you want to join an existing session that another user is logged into (ie. a desktop support situation), or monitor an unattended analysis that you are preforming since this method will log out other users. For that it would be best to use a system like TeamViewer (see below).
You will need to know the name of your computer (DEVICE NAME; e.g. SOH-F1BEBX or SOH-GJ34I1). To begin:
Note that your on-campus PC must be powered on and connected to the network. When you are done, DO NOT SHUT DOWN the computer you've remoted into. Log out ("sign off") the session instead.
If the computer is your personal workstation (not a shared lab computer) you may simply disconnect your session by closing the RDP window (you will remain logged in with an inactive session).
From your Windows PC at home:
- Connect to the Concordia VPN first
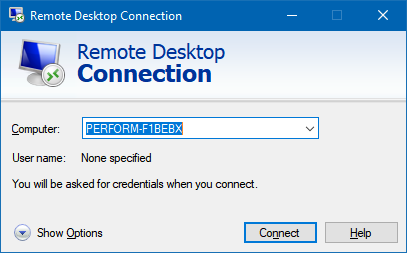
- Run "Remote Desktop Connection" - it is a built-in Windows tool: Use the Search Box in the task bar, or open the Start Menu => Start Typing "Remote Desktop Connection" which will give a shortcut to the program
- In the "Remote Desktop Connection" program, type the name of the PC (e.g. SOH-F1BEBX) you want to connect to (you might have to add ".concordia.ca" to the device name, i.e. SOH-F1BEBX.concordia.ca), and then select Connect
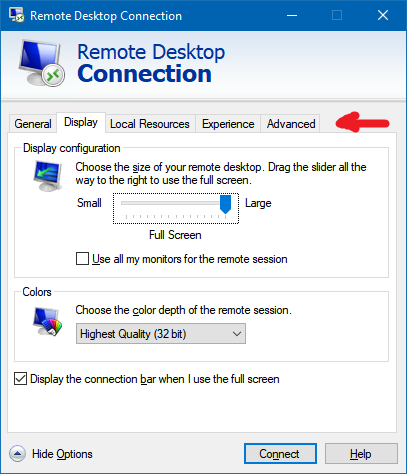
- Optionally, click "Show Options" to set other options, such as what resolution to run the remote desktop at, should you link local resources on your PC (clipboard, hard drives, printers) to the remote PC
- When prompted, provide your login credentials. Enter your Netname in the format "CONCORDIA\yournetname".
On your Windows, Mac, Android, or iOS device at home:
- Open the Microsoft Remote Desktop app (available for free from Microsoft Store, Google Play, and the iOS & Mac App Stores).
- Add the name of the PC (e.g. SOH-F1BEBX) that you want to connect to (you might have to add ".concordia.ca", eg. SOH-F1BEBX.concordia.ca).
- When prompted, provide your login credentials. Enter your Netname in the format "CONCORDIA\yournetname".
- Select the remote PC name that you added, and then wait for the connection to complete.
Reminder: DO NOT SHUT DOWN your machines after you are done using them remotely. We can't turn them back on without someone physically going to the lab location, and that might not be possible or could require a delay of a few days.
- TeamViewer
We've been using TeamViewer here since it's a popular system that is easy to use. In order for this to work, you need to have Team Viewer already installed and running on your on-campus machine and the one you are using at home. Team Viewer does not come installed on School of Health's machines, so unless you know it has already been installed, please contact IT first to install it for you. You can download it on your home computer from the official site: https://www.teamviewer.com/
- After TeamViewer is installed on the machine at Concordia and your own computer, connect to the Concordia VPN
- Open up the software and copy the ID and password from the remote (on-campus) machine, represented by (A) and (B) in the picture below.
- Then open up Team Viewer on your computer at home and enter in the ID from (A) into (C) and afterwards it will ask you for the password from (B).

Note: TeamViewer has become increasingly problematic from a licencing, cost, and security perspective. So it's use is being deprecated. We are no longer installing it on lab machines.
Reminder: DO NOT SHUT DOWN your machines after you are done using them remotely. We can't turn them back on without someone physically going to the lab location, and that might not be possible or could require a delay of a few days.
Connect to a Linux computer at Concordia
There are 2 options that are recommended here. We also advise against using TeamViewer since it sometimes has issues with the Linux graphics card driver.
- With a Terminal
- Connect to the Concordia VPN
- Open a terminal, replace the "yourNetname" and the "computerHostname" with your own information for the following command ssh -XY yourNetname@computerHostname
It will be the most reliable way to interact with your machine. The "-XY" flag will allow you to open graphical programs like Matlab / FSL.
- X2GO
- X2GO should already be installed on your on-campus machine ahead of time. If it isn't, when you're physically at the computer, install the server component from https://wiki.x2go.org/doku.php/download:start
- Install the x2go client on your home computer: https://wiki.x2go.org/doku.php/download:start
- Connect to the Concordia VPN
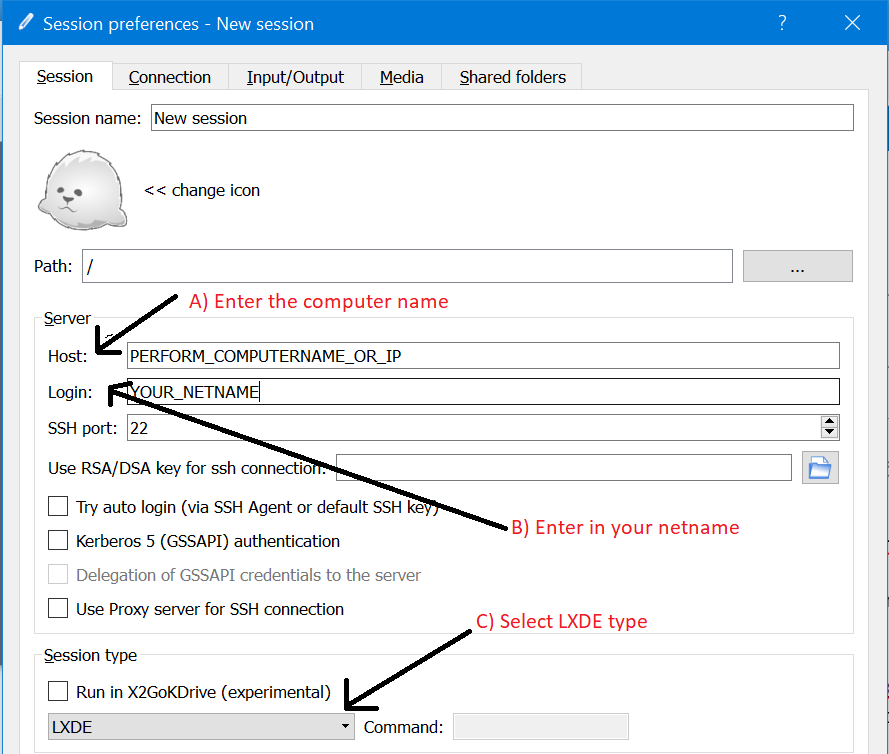
- For the "host" you enter your machine name (you might have to add ".concordia.ca" to the device name, ie CONU-1234.concordia.ca).
- For the "login", use your Netname.
- For the "session type", select LXDE.
That's all you need to set it up. Your session will show up on the right hand side of the application and you need to double click it and enter your netname password.
Reminder: DO NOT SHUT DOWN your machines after you are done using them remotely. We can't turn them back on without someone physically going to the lab location, and that might not be possible or could require a delay of a few days.
Connect to a Macintosh computer at Concordia
There are 2 options here:
- Mac's Screen Sharing
The Instructions to do so are quite lengthy, they are broken into 3 parts and described in details in the following links.
- Connect to the Concordia VPN
- Screen sharing must be enabled on your on-campus Mac:
https://support.apple.com/en-ca/guide/mac-help/mh11848/mac - Once that is setup, you can start screen sharing to access the machine:
https://support.apple.com/en-ca/guide/mac-help/mh14066/10.15/mac/10.15
- Team Viewer
- The instructions are the same as the Windows instructions above.
Reminder: DO NOT SHUT DOWN your machines after you are done using them remotely. We can't turn them back on without someone physically going to SOH, and that might not be possible or could require a delay of a few days.
Please remember that School of Health Research Members and their students also have access to the School of Health's cluster if you require additional computational power. Feel free to contact thomas.beaudry@concordia.ca if you need more help!
Network and VPN Support
For support to install, login, or troubleshoot the VPN, contact IITS Service Desk at help@concordia.ca
